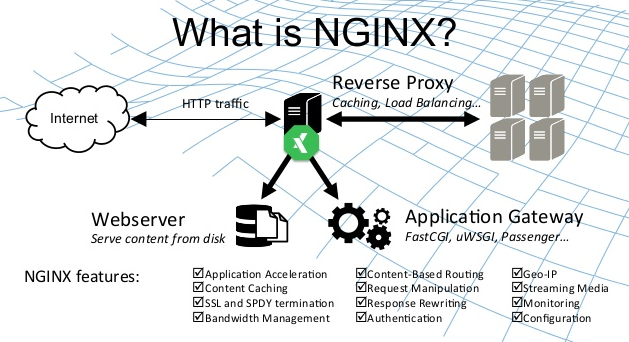
Nginx 简介 什么是 Nginx?
Nginx (engine x) 是一款轻量级的 Web 服务器 、反向代理服务器及电子邮件(IMAP/POP3)代理服务器。
安装 Nginx 首先,更新软件包列表并安装 Nginx。打开终端,然后输入以下命令:
1
2
Copy codesudo apt update sudo apt install nginx
检查 Nginx 是否正在运行。输入以下命令:
1
2
Copy code systemctl status nginx
如果 Nginx 正在运行,你会看到类似于以下内容的输出:
1
2
3
4
5
6
7
8
9
10
11
12
● nginx.service - A high performance web server and a reverse proxy server Loaded: loaded (/lib/systemd/system/nginx.service; enabled; vendor preset: enabled) Active: active (running) since Fri 2022-12-23 20:35:11 CST; 6min ago Docs: man:nginx(8) Process: 3031568 ExecStartPre=/usr/sbin/nginx -t -q -g daemon on; master_process on; (code=exited, status=0/SUCCESS) Process: 3031582 ExecStart=/usr/sbin/nginx -g daemon on; master_process on; (code=exited, status=0/SUCCESS) Main PID: 3031584 (nginx) Tasks: 2 (limit: 2264) Memory: 2.9M CGroup: /system.slice/nginx.service ├─3031584 nginx: master process /usr/sbin/nginx -g daemon on; master_process on; └─3031585 nginx: worker process
如果 Nginx 未运行,请尝试启动它:
1
2
Copy code sudo systemctl start nginx
如果你想让 Nginx 在每次启动系统时自动启动,请输入以下命令:
1
2
Copy code sudo systemctl enable nginx
这样,Nginx 就安装完成了。
配置 Nginx 1 2 3 4 5 6 7 8 9 10 11 12 13 14 15 16 17 18 19 20 21 22 23 24 25 26 27 28 29 30 31 32 33 34 35 36 37 38 39 40 41 42 43 44 45 46 47 48 49 50 user nginx; #启动进程,通常设置成和cpu的数量相等 worker_processes 1; #全局错误日志 error_log /etc/nginx/logs/error.log; error_log /etc/nginx/logs/notice.log notice; error_log /etc/nginx/logs/info.log info; #PID文件,记录当前启动的nginx的进程ID pid logs/nginx.pid; #工作模式及连接数上限 events { worker_connections 1024; #单个后台worker process进程的最大并发链接数 } #设定http服务器,利用它的反向代理功能提供负载均衡支持 http { #设定mime类型(邮件支持类型),类型由mime.types文件定义 include /etc/nginx/mime.types; default_type application/octet-stream; #设定日志 log_format main '$remote_addr - $remote_user [$time_local] "$request" ' '$status $body_bytes_sent "$http_referer" ' '"$http_user_agent" "$http_x_forwarded_for"'; access_log /etc/nginx/logs/access.log main; rewrite_log on; #sendfile 指令指定 nginx 是否调用 sendfile 函数(zero copy 方式)来输出文件,对于普通应用, #必须设为 on,如果用来进行下载等应用磁盘IO重负载应用,可设置为 off,以平衡磁盘与网络I/O处理速度,降低系统的uptime. sendfile on; #tcp_nopush on; #连接超时时间 #keepalive_timeout 0; keepalive_timeout 120; tcp_nodelay on; #gzip压缩开关 #gzip on; #HTTP服务器 location / { root html; index index.html index.htm; } }
常用命令
nginx -s stop
快速关闭Nginx,可能不保存相关信息,并迅速终止web服务。
nginx -s quit
平稳关闭Nginx,保存相关信息,有安排的结束web服务。
nginx -s reload
因改变了Nginx相关配置,需要重新加载配置而重载。
nginx -s reopen
重新打开日志文件。
nginx -c filename
为 Nginx 指定一个配置文件,来代替缺省的。
nginx -t
不运行,仅仅测试配置文件。nginx 将检查配置文件的语法的正确性,并尝试打开配置文件中所引用到的文件。
nginx -v
显示 nginx 的版本。
nginx -V
显示 nginx 的版本,编译器版本和配置参数。
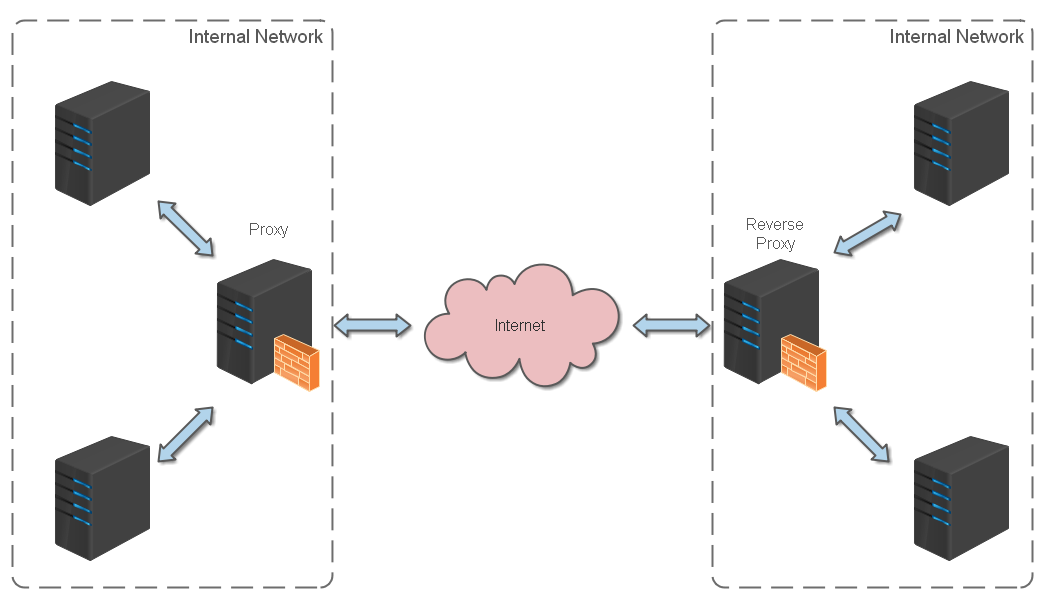
反向代理 什么是反向代理?
反向代理(Reverse Proxy)方式是指以代理服务器来接受 internet 上的连接请求,然后将请求转发给内部网络上的服务器,并将从服务器上得到的结果返回给 internet 上请求连接的客户端,此时代理服务器对外就表现为一个反向代理服务器。
这里实现将nginx服务器本地的80端口转发到8088端口
1
2
3
4
5
6
7
8
9
10
11
server{ listen 80; #监听80端口 server_name 127.0.0.1; #定义使用访问名,为ip地址或域名 location / { #转发或处理 proxy_pass http://127.0.0.1:8088; #目标地址 # proxy_set_header Host $proxy_host; # proxy_set_header X-Real-IP $remote_addr; # proxy_set_header X-Forwarded-For $proxy_add_x_forwarded_for; } }
也可以实现转发到域名yumoyumo.top
1
2
3
4
5
6
7
8
9
10
11
server{ listen 80; #监听80端口 server_name 127.0.0.1; #定义使用访问名,为ip地址或域名 location / { #转发或处理 proxy_pass http://yumoyumo.top; #目标地址 # proxy_set_header Host $proxy_host; # proxy_set_header X-Real-IP $remote_addr; # proxy_set_header X-Forwarded-For $proxy_add_x_forwarded_for; } }
location 路径映射
符号
含义
=开头表示精确匹配
^~开头表示 uri 以某个常规字符串开头,理解为匹配 url 路径即可。nginx 不对 url 做编码,因此请求为 /static/20%/aa,可以被规则 ^~ /static/ /aa 匹配到(注意是空格)
~开头表示区分大小写的正则匹配
~*开头表示不区分大小写的正则匹配
/通用匹配,任何请求都会匹配到
多个 location 配置的情况下匹配顺序为
首先匹配 =
其次匹配 ^~
其次是按文件中顺序的正则匹配
最后是交给 / 通用匹配
当有匹配成功时候,停止匹配,按当前匹配规则处理请求
举例:
1
2
3
4
5
6
7
8
9
10
11
12
13
14
15
16
17
18
19
20
21
22
23
24
25
26
location = / { #规则A } location = /login { #规则B } location ^~ /static/ { #规则C } location ~ \.(gif|jpg|png|js|css)$ { #规则D } location ~* \.png$ { #规则E } location / { #规则F } 那么产生的效果如下: 访问根目录 /, 比如 http://localhost/ 将匹配规则 A 访问 http://localhost/login 将匹配规则 B,http://localhost/register 则匹配规则 F 访问 http://localhost/static/a.html 将匹配规则 C 访问 http://localhost/a.gif, http://localhost/b.jpg 将匹配规则 D和规则 E,但是规则 D 顺序优先,规则 E不起作用,而 http://localhost/static/c.png则优先匹配到规则 C 访问 http://localhost/a.PNG 则匹配规则 E,而不会匹配规则 D,因为规则 E 不区分大小写 访问 http://localhost/category/id/1111 则最终匹配到规则 F,因为以上规则都不匹配,这个时候应该是 nginx 转发请求给后端应用服务器,比如 FastCGI(PHP),tomcat(jsp),nginx 作为反向代理服务器存在
proxy_pass加 / 与不加 / 在配置proxy_pass代理转发时,如果后面的url加/,表示绝对根路径;如果没有/,表示相对路径
例如
加 /
1
2
3
4
server_name example.com location /data/ { proxy_pass http://127.0.0.1/; }
访问 http://example.com/data/index.html会转发到 http://127.0.0.1/index.html
不加 /
1
2
3
4
server_name example.com location /data/ { proxy_pass http://127.0.0.1; }
访问 http://example.com/data/index.html会转发到 http://127.0.0.1/data/index.html
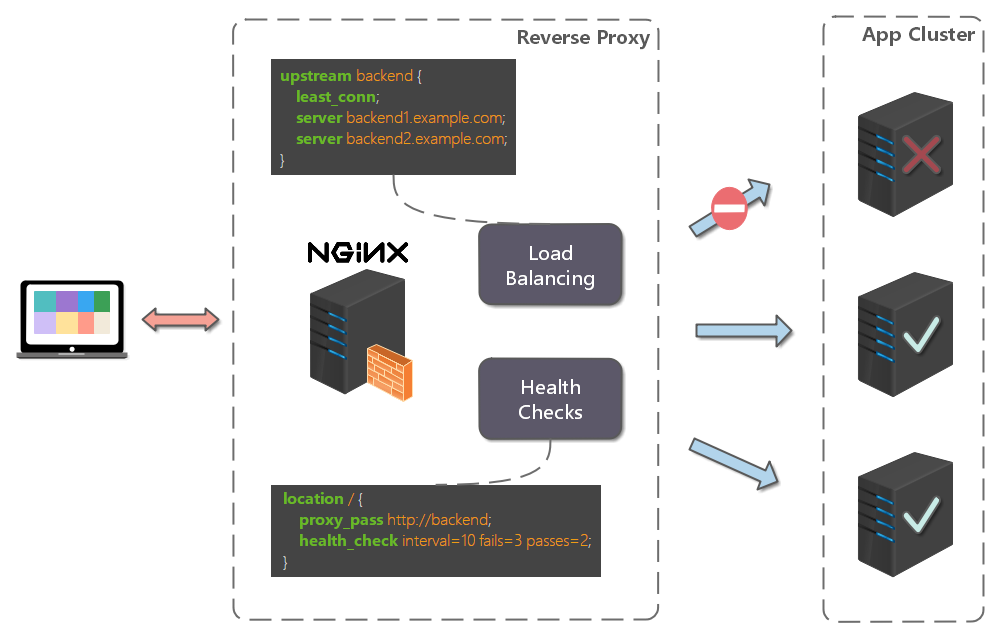
负载均衡 前面的例子中,代理仅仅指向一个服务器。
但是,网站在实际运营过程中,大部分都是以集群的方式运行,这时需要使用负载均衡来分流。
nginx 也可以实现简单的负载均衡功能。
假设这样一个应用场景:将应用部署在 192.168.1.11:80、192.168.1.12:80、192.168.1.13:80 三台 linux 环境的服务器上。网站域名叫 www.helloworld.com,公网 IP 为 192.168.1.11。在公网 IP 所在的服务器上部署 nginx,对所有请求做负载均衡处理(下面例子中使用的是加权轮询策略)
1
2
3
4
5
6
7
8
9
10
11
12
13
14
15
16
17
18
19
20
21
22
23
24
25
26
27
28
29
30
31
32
33
34
35
36
37
38
39
40
41
42
43
44
45
46
47
48
http { #设定mime类型,类型由mime.type文件定义 include /etc/nginx/mime.types; default_type application/octet-stream; #设定日志格式 access_log /var/log/nginx/access.log; #设定负载均衡的服务器列表 upstream load_balance_server { #weigth参数表示权值,权值越高被分配到的几率越大 server 192.168.1.11:80 weight=5; server 192.168.1.12:80 weight=1; server 192.168.1.13:80 weight=6; } #HTTP服务器 server { #侦听80端口 listen 80; #定义使用www.xx.com访问 server_name www.helloworld.com; #对所有请求进行负载均衡请求 location / { root /root; #定义服务器的默认网站根目录位置 index index.html index.htm; #定义首页索引文件的名称 proxy_pass http://load_balance_server ;#请求转向load_balance_server 定义的服务器列表 #以下是一些反向代理的配置(可选择性配置) #proxy_redirect off; proxy_set_header Host $host; proxy_set_header X-Real-IP $remote_addr; #后端的Web服务器可以通过X-Forwarded-For获取用户真实IP proxy_set_header X-Forwarded-For $remote_addr; proxy_connect_timeout 90; #nginx跟后端服务器连接超时时间(代理连接超时) proxy_send_timeout 90; #后端服务器数据回传时间(代理发送超时) proxy_read_timeout 90; #连接成功后,后端服务器响应时间(代理接收超时) proxy_buffer_size 4k; #设置代理服务器(nginx)保存用户头信息的缓冲区大小 proxy_buffers 4 32k; #proxy_buffers缓冲区,网页平均在32k以下的话,这样设置 proxy_busy_buffers_size 64k; #高负荷下缓冲大小(proxy_buffers*2) proxy_temp_file_write_size 64k; #设定缓存文件夹大小,大于这个值,将从upstream服务器传 client_max_body_size 10m; #允许客户端请求的最大单文件字节数 client_body_buffer_size 128k; #缓冲区代理缓冲用户端请求的最大字节数 } } }
负载均衡策略 Nginx 提供了多种负载均衡策略,让我们来一一了解一下:
负载均衡策略在各种分布式系统中基本上原理一致,对于原理有兴趣,不妨参考 负载均衡
轮询
1
2
3
4
5
6
upstream bck_testing_01 { # 默认所有服务器权重为 1 server 192.168.250.220:8080 server 192.168.250.221:8080 server 192.168.250.222:8080 }
加权轮询
1
2
3
4
5
upstream bck_testing_01 { server 192.168.250.220:8080 weight=3 server 192.168.250.221:8080 # default weight=1 server 192.168.250.222:8080 # default weight=1 }
最少连接
1
2
3
4
5
6
7
8
upstream bck_testing_01 { least_conn; # with default weight for all (weight=1) server 192.168.250.220:8080 server 192.168.250.221:8080 server 192.168.250.222:8080 }
加权最少连接
1
2
3
4
5
6
7
upstream bck_testing_01 { least_conn; server 192.168.250.220:8080 weight=3 server 192.168.250.221:8080 # default weight=1 server 192.168.250.222:8080 # default weight=1 }
IP Hash
1
2
3
4
5
6
7
8
9
10
upstream bck_testing_01 { ip_hash; # with default weight for all (weight=1) server 192.168.250.220:8080 server 192.168.250.221:8080 server 192.168.250.222:8080 }
普通 Hash
1
2
3
4
5
6
7
8
9
10
upstream bck_testing_01 { hash $request_uri; # with default weight for all (weight=1) server 192.168.250.220:8080 server 192.168.250.221:8080 server 192.168.250.222:8080 }
多 web 配置 当一个网站功能越来越丰富时,往往需要将一些功能相对独立的模块剥离出来,独立维护。这样的话,通常,会有多个 webapp。
举个例子:假如 www.helloworld.com站点有好几个 webapp,finance(金融)、product(产品)、admin(用户中心)。访问这些应用的方式通过上下文(context)来进行区分:
www.helloworld.com/finance/
www.helloworld.com/product/
www.helloworld.com/admin/
我们知道,http 的默认端口号是 80,如果在一台服务器上同时启动这 3 个 webapp 应用,都用 80 端口,肯定是不成的。所以,这三个应用需要分别绑定不同的端口号。
那么,问题来了,用户在实际访问 www.helloworld.com 站点时,访问不同 webapp,总不会还带着对应的端口号去访问吧。所以,你再次需要用到反向代理来做处理。
配置也不难,来看看怎么做吧:
1
2
3
4
5
6
7
8
9
10
11
12
13
14
15
16
17
18
19
20
21
22
23
24
25
26
27
28
29
30
31
32
33
34
35
http { #此处省略一些基本配置 upstream product_server{ server www.helloworld.com:8081; } upstream admin_server{ server www.helloworld.com:8082; } upstream finance_server{ server www.helloworld.com:8083; } server { #此处省略一些基本配置 #默认指向product的server location / { proxy_pass http://product_server; } location /product/{ proxy_pass http://product_server; } location /admin/ { proxy_pass http://admin_server; } location /finance/ { proxy_pass http://finance_server; } } }
静态站点 有时候,我们需要配置静态站点(即 html 文件和一堆静态资源。
举例来说:如果所有的静态资源都放在了 /app/dist 目录下,我们只需要在 nginx.conf 中指定首页以及这个站点的 host 即可。
配置如下:
1
2
3
4
5
6
7
8
9
10
11
12
13
14
15
16
17
18
19
20
21
22
23
24
25
26
27
worker_processes 1; events { worker_connections 1024; } http { include /etc/nginx/mime.types; default_type application/octet-stream; sendfile on; keepalive_timeout 65; gzip on; gzip_types text/plain application/x-javascript text/css application/xml text/javascript application/javascript image/jpeg image/gif image/png; gzip_vary on; server { listen 80; server_name static.zp.cn; location / { root /app/dist; # 静态资源路径 index index.html; # 默认访问路径下的什么资源 autoindex on; #展示静态资源的全部内容,以列表的形式展开 } } }
然后,添加 HOST:
127.0.0.1 static.zp.cn
此时,在本地浏览器访问的路径和经Nginx代理后的路径的对应关系:
static.zp.cn -> 127.0.0.1/app/dist/index.html
static.zp.cn/hello.html -> 127.0.0.1/app/dist/hello.html